Micro speech example
This example shows how you can use TensorFlow Lite to run a 20 kilobyte neural network model to recognize keywords in speech. It's designed to run on systems with very small amounts of memory such as microcontrollers and DSPs.
The example application listens to its surroundings with a microphone and indicates when it has detected a word by lighting an LED or displaying data on a screen, depending on the capabilities of the device.
The code has a small footprint (for example around 22 kilobytes on a Cortex M3) and only uses about 10 kilobytes of RAM for working memory, so it's able to run on systems like an STM32F103 with only 20 kilobytes of total SRAM and 64 kilobytes of Flash.
Table of contents
- Getting started
- Deploy to Arduino
- Deploy to SparkFun Edge
- Deploy to STM32F746
- Deploy to NXP FRDM K66F
- Run on macOS
- Run the tests on a development machine
- Calculating the input to the neural network
- Train your own model
Deploy to Arduino
The following instructions will help you build and deploy this sample to Arduino devices.
The sample has been tested with the following devices:
The Arduino Nano 33 BLE Sense is currently the only Arduino with a built-in microphone. If you‘re using a different Arduino board and attaching your own microphone, you’ll need to implement your own +audio_provider.cc+. It also has a built-in LED, which is used to indicate that a word has been recognized.
Install the Arduino_TensorFlowLite library
This example application is included as part of the official TensorFlow Lite Arduino library. To install it, open the Arduino library manager in Tools -> Manage Libraries... and search for Arduino_TensorFlowLite.
Load and run the example
Once the library has been added, go to File -> Examples. You should see an example near the bottom of the list named TensorFlowLite:micro_speech. Select it and click micro_speech to load the example.
Use the Arduino IDE to build and upload the example. Once it is running, you should see the built-in LED on your device flashing. Saying the word “yes” will cause the LED to remain on for 3 seconds. The current model has fairly low accuracy, so you may have to repeat “yes” a few times.
The program also outputs inference results to the serial port, which appear as follows:
Heard yes (201) @4056ms
Heard no (205) @6448ms
Heard unknown (201) @13696ms
Heard yes (205) @15000ms
The number after each detected word is its score. By default, the program only considers matches as valid if their score is over 200, so all of the scores you see will be at least 200.
When the program is run, it waits 5 seconds for a USB-serial connection to be available. If there is no connection available, it will not output data. To see the serial output in the Arduino desktop IDE, do the following:
- Open the Arduino IDE
- Connect the Arduino board to your computer via USB
- Press the reset button on the Arduino board
- Within 5 seconds, go to
Tools -> Serial Monitorin the Arduino IDE. You may have to try several times, since the board will take a moment to connect.
If you don't see any output, repeat the process again.
Deploy to SparkFun Edge
The following instructions will help you build and deploy this sample on the SparkFun Edge development board.
The program will toggle the blue LED on and off with each inference. It will switch on the yellow LED when a “yes” is heard, the red LED when a “no” is heard, and the green LED when an unknown command is heard.
The AI on a microcontroller with TensorFlow Lite and SparkFun Edge walks through the deployment process in detail. The steps are also summarized below.
Compile the binary
The following command will download the required dependencies and then compile a binary for the SparkFun Edge:
make -f tensorflow/lite/experimental/micro/tools/make/Makefile TARGET=sparkfun_edge TAGS="CMSIS" micro_speech_bin
The binary will be created in the following location:
tensorflow/lite/experimental/micro/tools/make/gen/sparkfun_edge_cortex-m4/bin/micro_speech.bin
Sign the binary
The binary must be signed with cryptographic keys to be deployed to the device. We'll now run some commands that will sign our binary so it can be flashed to the SparkFun Edge. The scripts we are using come from the Ambiq SDK, which is downloaded when the Makefile is run.
Enter the following command to set up some dummy cryptographic keys we can use for development:
cp tensorflow/lite/experimental/micro/tools/make/downloads/AmbiqSuite-Rel2.0.0/tools/apollo3_scripts/keys_info0.py \
tensorflow/lite/experimental/micro/tools/make/downloads/AmbiqSuite-Rel2.0.0/tools/apollo3_scripts/keys_info.py
Next, run the following command to create a signed binary:
python3 tensorflow/lite/experimental/micro/tools/make/downloads/AmbiqSuite-Rel2.0.0/tools/apollo3_scripts/create_cust_image_blob.py \
--bin tensorflow/lite/experimental/micro/tools/make/gen/sparkfun_edge_cortex-m4/bin/micro_speech.bin \
--load-address 0xC000 \
--magic-num 0xCB \
-o main_nonsecure_ota \
--version 0x0
This will create the file main_nonsecure_ota.bin. We'll now run another command to create a final version of the file that can be used to flash our device with the bootloader script we will use in the next step:
python3 tensorflow/lite/experimental/micro/tools/make/downloads/AmbiqSuite-Rel2.0.0/tools/apollo3_scripts/create_cust_wireupdate_blob.py \
--load-address 0x20000 \
--bin main_nonsecure_ota.bin \
-i 6 \
-o main_nonsecure_wire \
--options 0x1
You should now have a file called main_nonsecure_wire.bin in the directory where you ran the commands. This is the file we'll be flashing to the device.
Flash the binary
Next, attach the board to your computer via a USB-to-serial adapter.
Note: If you're using the SparkFun Serial Basic Breakout, you should install the latest drivers before you continue.
Once connected, assign the USB device name to an environment variable:
export DEVICENAME=put your device name here
Set another variable with the baud rate:
export BAUD_RATE=921600
Now, hold the button marked 14 on the device. While still holding the button, hit the button marked RST. Continue holding the button marked 14 while running the following command:
python3 tensorflow/lite/experimental/micro/tools/make/downloads/AmbiqSuite-Rel2.0.0/tools/apollo3_scripts/uart_wired_update.py \
-b ${BAUD_RATE} ${DEVICENAME} \
-r 1 \
-f main_nonsecure_wire.bin \
-i 6
You should see a long stream of output as the binary is flashed to the device. Once you see the following lines, flashing is complete:
Sending Reset Command.
Done.
If you don't see these lines, flashing may have failed. Try running through the steps in Flash the binary again (you can skip over setting the environment variables). If you continue to run into problems, follow the AI on a microcontroller with TensorFlow Lite and SparkFun Edge codelab, which includes more comprehensive instructions for the flashing process.
The binary should now be deployed to the device. Hit the button marked RST to reboot the board.
You should see the device's blue LED flashing. The yellow LED should light when a “yes” is heard, the red LED when a “no” is heard, and the green LED when an unknown command is heard. The current model has fairly low accuracy, so you may have to repeat “yes” a few times.
Debug information is logged by the board while the program is running. To view it, establish a serial connection to the board using a baud rate of 115200. On OSX and Linux, the following command should work:
screen ${DEVICENAME} 115200
You will see a line output for every word that is detected:
Heard yes (201) @4056ms
Heard no (205) @6448ms
Heard unknown (201) @13696ms
Heard yes (205) @15000ms
The number after each detected word is its score. By default, the program only considers matches as valid if their score is over 200, so all of the scores you see will be at least 200.
To stop viewing the debug output with screen, hit Ctrl+A, immediately followed by the K key, then hit the Y key.
Deploy to STM32F746
The following instructions will help you build and deploy the sample to the STM32F7 discovery kit using ARM Mbed.
Before we begin, you'll need the following:
- STM32F7 discovery kit board
- Mini-USB cable
- ARM Mbed CLI (installation instructions)
- Python 2.7 and pip
Since Mbed requires a special folder structure for projects, we'll first run a command to generate a subfolder containing the required source files in this structure:
make -f tensorflow/lite/experimental/micro/tools/make/Makefile TARGET=mbed TAGS="CMSIS disco_f746ng" generate_micro_speech_mbed_project
Running the make command will result in the creation of a new folder:
tensorflow/lite/experimental/micro/tools/make/gen/mbed_cortex-m4/prj/micro_speech/mbed
This folder contains all of the example's dependencies structured in the correct way for Mbed to be able to build it.
Change into the directory and run the following commands, making sure you are using Python 2.7.15.
First, tell Mbed that the current directory is the root of an Mbed project:
mbed config root .
Next, tell Mbed to download the dependencies and prepare to build:
mbed deploy
By default, Mbed will build the project using C++98. However, TensorFlow Lite requires C++11. Run the following Python snippet to modify the Mbed configuration files so that it uses C++11:
python -c 'import fileinput, glob;
for filename in glob.glob("mbed-os/tools/profiles/*.json"):
  for line in fileinput.input(filename, inplace=True):
    print line.replace("\"-std=gnu++98\"","\"-std=c++11\", \"-fpermissive\"")'
Finally, run the following command to compile:
mbed compile -m DISCO_F746NG -t GCC_ARM
This should result in a binary at the following path:
./BUILD/DISCO_F746NG/GCC_ARM/mbed.bin
To deploy, plug in your STM board and copy the file to it. On macOS, you can do this with the following command:
cp ./BUILD/DISCO_F746NG/GCC_ARM/mbed.bin /Volumes/DIS_F746NG/
Copying the file will initiate the flashing process.
The inference results are logged by the board while the program is running. To view it, establish a serial connection to the board using a baud rate of 9600. On OSX and Linux, the following command should work, replacing /dev/tty.devicename with the name of your device as it appears in /dev:
screen /dev/tty.devicename 9600
You will see a line output for every word that is detected:
Heard yes (201) @4056ms
Heard no (205) @6448ms
Heard unknown (201) @13696ms
Heard yes (205) @15000ms
The number after each detected word is its score. By default, the program only considers matches as valid if their score is over 200, so all of the scores you see will be at least 200.
To stop viewing the debug output with screen, hit Ctrl+A, immediately followed by the K key, then hit the Y key.
Deploy to NXP FRDM K66F
The following instructions will help you build and deploy the sample to the NXP FRDM K66F using ARM Mbed.
Download the TensorFlow source code.
Follow instructions from mbed website to setup and install mbed CLI.
Compile TensorFlow with the following command to generate mbed project:
make -f tensorflow/lite/experimental/micro/tools/make/Makefile TARGET=mbed TAGS="nxp_k66f" generate_micro_speech_mbed_project
Go to the location of the generated project. The generated project is usually in
tensorflow/lite/experimental/micro/tools/make/gen/mbed_cortex-m4/prj/micro_speech/mbedCreate a mbed project using the generated files:
mbed new .Change the project setting to use C++ 11 rather than C++ 14 using:
python -c 'import fileinput, glob;
for filename in glob.glob("mbed-os/tools/profiles/*.json"):
  for line in fileinput.input(filename, inplace=True):
    print line.replace("\"-std=gnu++14\"","\"-std=c++11\", \"-fpermissive\"")'
To compile project, use the following command:
mbed compile --target K66F --toolchain GCC_ARM --profile release
For some mbed compliers, you may get compile error in mbed_rtc_time.cpp. Go to
mbed-os/platform/mbed_rtc_time.hand comment line 32 and line 37://#if !defined(__GNUC__) || defined(__CC_ARM) || defined(__clang__) struct timeval { time_t tv_sec; int32_t tv_usec; }; //#endifLook at helpful resources from NXP website such as NXP FRDM-K66F User guide and NXP FRDM-K66F Getting Started to understand information about the board.
Connect the USB cable to the micro USB port. When the Ethernet port is facing towards you, the micro USB port is left of the Ethernet port.
To compile and flash in a single step, add the
--flashoption:
```
mbed compile --target K66F --toolchain GCC_ARM --profile release --flash
```
Disconnect USB cable from the device to power down the device and connect back the power cable to start running the model.
Connect to serial port with baud rate of 9600 and correct serial device to view the output from the MCU. In linux, you can run the following screen command if the serial device is
/dev/ttyACM0:sudo screen /dev/ttyACM0 9600
Saying “Yes” will print “Yes” and “No” will print “No” on the serial port.
A loopback path from microphone to headset jack is enabled. Headset jack is in black color. If there is no output on the serial port, you can connect headphone to headphone port to check if audio loopback path is working.
Run on macOS
The example contains an audio provider compatible with macOS. If you have access to a Mac, you can run the example on your development machine.
First, use the following command to build it:
make -f tensorflow/lite/experimental/micro/tools/make/Makefile micro_speech
Once the build completes, you can run the example with the following command:
tensorflow/lite/experimental/micro/tools/make/gen/osx_x86_64/bin/micro_speech
You might see a pop-up asking for microphone access. If so, grant it, and the program will start.
Try saying “yes” and “no”. You should see output that looks like the following:
Heard yes (201) @4056ms
Heard no (205) @6448ms
Heard unknown (201) @13696ms
Heard yes (205) @15000ms
Heard yes (205) @16856ms
Heard unknown (204) @18704ms
Heard no (206) @21000ms
The number after each detected word is its score. By default, the recognize commands component only considers matches as valid if their score is over 200, so all of the scores you see will be at least 200.
The number after the score is the number of milliseconds since the program was started.
If you don‘t see any output, make sure your Mac’s internal microphone is selected in the Mac's Sound menu, and that its input volume is turned up high enough.
Run the tests on a development machine
To compile and test this example on a desktop Linux or macOS machine, download the TensorFlow source code, cd into the source directory from a terminal, and then run the following command:
make -f tensorflow/lite/experimental/micro/tools/make/Makefile test_micro_speech_test
This will take a few minutes, and downloads frameworks the code uses like CMSIS and flatbuffers. Once that process has finished, you should see a series of files get compiled, followed by some logging output from a test, which should conclude with ~~~ALL TESTS PASSED~~~.
If you see this, it means that a small program has been built and run that loads the trained TensorFlow model, runs some example inputs through it, and got the expected outputs.
To understand how TensorFlow Lite does this, you can look at the source in micro_speech_test.cc. It‘s a fairly small amount of code that creates an interpreter, gets a handle to a model that’s been compiled into the program, and then invokes the interpreter with the model and sample inputs.
Calculating the input to the neural network
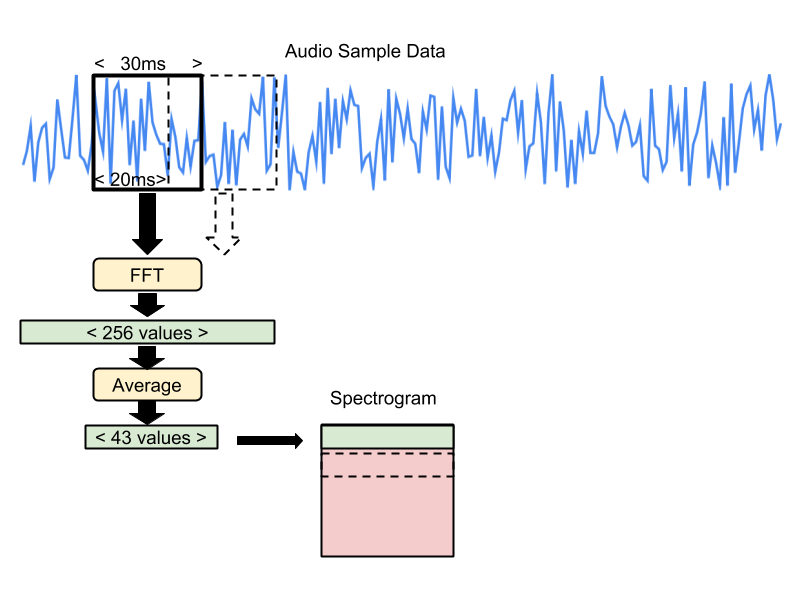
The TensorFlow Lite model doesn't take in raw audio sample data. Instead it works with spectrograms, which are two dimensional arrays that are made up of slices of frequency information, each taken from a different time window. This test uses spectrograms that have been pre-calculated from one-second WAV files in the test data set. In a complete application these spectrograms would be calculated at runtime from microphone inputs, but the code for doing that is not yet included in this sample code.
The recipe for creating the spectrogram data is that each frequency slice is created by running an FFT across a 30ms section of the audio sample data. The input samples are treated as being between -1 and +1 as real values (encoded as -32,768 and 32,767 in 16-bit signed integer samples).
This results in an FFT with 256 entries. Every sequence of six entries is averaged together, giving a total of 43 frequency buckets in the final slice. The results are stored as unsigned eight-bit values, where 0 represents a real number of zero, and 255 represents 127.5 as a real number.
Each adjacent frequency entry is stored in ascending memory order (frequency bucket 0 at data[0], bucket 1 at data [1], etc). The window for the frequency analysis is then moved forward by 20ms, and the process repeated, storing the results in the next memory row (for example bucket 0 in this moved window would be in data[43 + 0], etc). This process happens 49 times in total, producing a single channel image that is 43 pixels wide, and 49 rows high.
Here's an illustration of the process:
The test data files have been generated by running the following commands. See the training instructions below to learn how to set up the environment to run them.
python tensorflow/tensorflow/examples/speech_commands/wav_to_features.py \
--input_wav=/tmp/speech_dataset/yes/f2e59fea_nohash_1.wav \
--output_c_file=/tmp/yes_features_data.cc \
--window_stride=20 --preprocess=average --quantize=1

python tensorflow/tensorflow/examples/speech_commands/wav_to_features.py \
--input_wav=/tmp/speech_dataset/no/f9643d42_nohash_4.wav \
--output_c_file=/tmp/no_features_data.cc \
--window_stride=20 --preprocess=average --quantize=1
Train your own model
The neural network model used in this example was built using the TensorFlow speech commands tutorial. You can retrain it to recognize any combination of words from this list:
yes
no
up
down
left
right
on
off
stop
go
Use Google Colaboratory
The easiest way to train your own speech model is by running train_speech_model.ipynb in Google Colaboratory. This avoids the need to install dependencies, and allows the use of GPUs for training. Total training time will be 1.5-2hrs.
We strongly recommend trying this approach first.
Use your local machine
You can use the following commands to train the model on your own machine. It may be easiest to run these commands in a TensorFlow Docker container.
You must currently use the TensorFlow Nightly pip package. This version is confirmed to work:
tf-nightly-gpu==1.15.0.dev20190729
To begin training, run the following:
python tensorflow/tensorflow/examples/speech_commands/train.py \
--model_architecture=tiny_conv --window_stride=20 --preprocess=micro \
--wanted_words="on,off" --silence_percentage=25 --unknown_percentage=25 \
--quantize=1 --verbosity=INFO --how_many_training_steps="15000,3000" \
--learning_rate="0.001,0.0001" --summaries_dir=/tmp/retrain_logs \
--data_dir=/tmp/speech_dataset --train_dir=/tmp/speech_commands_train
The training process is likely to take a couple of hours. Once it has completed, the next step is to freeze the variables:
python tensorflow/tensorflow/examples/speech_commands/freeze.py \
--model_architecture=tiny_conv --window_stride=20 --preprocess=micro \
--wanted_words="yes,no" --quantize=1 --output_file=/tmp/tiny_conv.pb \
--start_checkpoint=/tmp/speech_commands_train/tiny_conv.ckpt-18000
The next step is to create a TensorFlow Lite file from the frozen graph:
toco \
--graph_def_file=/tmp/tiny_conv.pb --output_file=/tmp/tiny_conv.tflite \
--input_shapes=1,49,40,1 --input_arrays=Reshape_2 --output_arrays='labels_softmax' \
--inference_type=QUANTIZED_UINT8 --mean_values=0 --std_dev_values=9.8077
Finally, convert the file into a C source file that can be compiled into an embedded system:
xxd -i /tmp/tiny_conv.tflite > /tmp/tiny_conv_micro_features_model_data.cc
Use Google Cloud
If want to train your model in Google Cloud you can do so by using pre-configured Deep Learning images.
First create the VM:
export IMAGE_FAMILY="tf-latest-cpu"
export ZONE="us-west1-b" # Or any other required region
export INSTANCE_NAME="model-trainer"
export INSTANCE_TYPE="n1-standard-8" # or any other instance type
gcloud compute instances create $INSTANCE_NAME \
        --zone=$ZONE \
        --image-family=$IMAGE_FAMILY \
        --image-project=deeplearning-platform-release \
        --machine-type=$INSTANCE_TYPE \
        --boot-disk-size=120GB \
        --min-cpu-platform=Intel\ Skylake
As soon as instance has been created you can SSH to it(as a jupyter user!):
gcloud compute ssh "jupyter@${INSTANCE_NAME}"
Finally, follow the instructions in the previous section to train the model. Do not forget to remove the instance when training is done:
gcloud compute instances delete "${INSTANCE_NAME}" --zone="${ZONE}"